|
|  |
| Notices |
Welcome to the sSnakeSs community. You are currently viewing our boards as a guest which gives you limited access to view most discussions and access our other features. By joining our free community you will have access to post topics, communicate privately with other members (PM), respond to polls, upload content and access many other special features. Registration is fast, simple and absolutely free so please, join our community today! If you have any problems with the registration process or your account login, please contact contact us.
|
 03-28-15, 12:56 PM
|
#46
|
|
Forum Moderator
Join Date: Jan-2014
Posts: 4,329
Country: 
|
Re: My DIY snakeroom part 2, Backgrounds.
Part 2 of painting (part one on previous page)
Added a part of the highlights, the picture is bad sadly.
A last close up before i have to let it dry until i can continue.
It looks a lot better irl than it does on pictures, but it gives a pretty good idea  Just a lill touch up painting left to do, and then i can add the epoxy resin! Once thats on, it's 100% done. Snake can move in, and i can move onto the next tub...
Only a few... heh what the hell did i get myself into..
http://i270.photobucket.com/albums/j...psgfb9ffqg.jpg
__________________
Aho ni toriau baka!- Baka wa shinanakya naoranai...
|

|
|
|
03-28-15, 09:36 PM
|
#47
|
|
Member
Join Date: Jan-2015
Location: Youngstown
Posts: 905
Country: 
|
Re: My DIY snakeroom part 2, Backgrounds.
Are you going to add anymore lighting?
|
|
|
|
|
03-29-15, 03:35 AM
|
#48
|
|
Forum Moderator
Join Date: Jan-2014
Posts: 4,329
Country:
|
 Re: My DIY snakeroom part 2, Backgrounds.
I don't really see a reason to add more lighting. It is already bright enough that it supports plant growth. Thats without any natural light reaching the terrariums, during the day with the sun on the window i could turn the LEDs off even. Anyway, first 2 pics i had the wrong settings on my phone camera  they do look a bit dark. The last picture was taken without flash - after dark. No additional lighting on either.
__________________
Aho ni toriau baka!- Baka wa shinanakya naoranai...
|
|
|
|
|
03-29-15, 12:45 PM
|
#49
|
|
Member
Join Date: Mar-2015
Posts: 3,317
Country:
|
Re: My DIY snakeroom part 2, Backgrounds.
Fantastic job boss!
|
|
|
|
|
03-29-15, 01:25 PM
|
#50
|
|
Forum Moderator
Join Date: Jan-2014
Posts: 4,329
Country:
|
Re: My DIY snakeroom part 2, Backgrounds.
Thanks Albert
__________________
Aho ni toriau baka!- Baka wa shinanakya naoranai...
|
|
|
|
|
03-30-15, 06:33 AM
|
#51
|
|
Member
Join Date: Apr-2013
Location: Near GTA
Posts: 472
Country: 
|
Re: My DIY snakeroom part 2, Backgrounds.
Looks amazing.
Good planning and hard work make great results look easy.
Can't wait to see the final results with critters "installed".
C&H
__________________
1.1 Us (Chris & Heather)
0.1 Yellow Naped Amazon Parrot
9.80+ Various Ball Pythons (give or take)
|
|
|
|
|
03-30-15, 07:22 AM
|
#52
|
|
Forum Moderator
Join Date: Jan-2014
Posts: 4,329
Country:
|
Re: My DIY snakeroom part 2, Backgrounds.
Thx Chris, me neither
__________________
Aho ni toriau baka!- Baka wa shinanakya naoranai...
|
|
|
|
|
03-30-15, 02:37 PM
|
#53
|
|
Forum Moderator
Join Date: Sep-2011
Location: Overhill and underhill.
Posts: 7,365
Country:
|
Re: My DIY snakeroom part 2, Backgrounds.
Quote:
Originally Posted by Ballchris

your right on that lol, never paid attention to were shes from.
were would be a good place to order some foam like this?
|
Not a clue, never worked with the stuff.
|
|
|
|
|
03-30-15, 05:12 PM
|
#54
|
|
Member
Join Date: Mar-2015
Posts: 7
Country:
|
Re: My DIY snakeroom part 2, Backgrounds.
this is just amazing I love the work you have done.
|
|
|
|
|
03-30-15, 06:08 PM
|
#55
|
|
Member
Join Date: Nov-2014
Location: Kitchener Ont
Posts: 1,508
Country:
|
Re: My DIY snakeroom part 2, Backgrounds.
Looks great. now just looking forward to seeing it occupied!
|
|
|
|
|
03-31-15, 04:50 AM
|
#56
|
|
Forum Moderator
Join Date: Jan-2014
Posts: 4,329
Country:
|
Re: My DIY snakeroom part 2, Backgrounds.
Thx! Finished the painting today, it's ready for sealing !! i just need 2 consecutive days off to seal them... Not sure when i will have that, i hope soon!
__________________
Aho ni toriau baka!- Baka wa shinanakya naoranai...
|
|
|
|
|
04-01-15, 02:59 AM
|
#57
|
|
Forum Moderator
Join Date: Jan-2014
Posts: 4,329
Country:
|
Re: My DIY snakeroom part 2, Backgrounds.
__________________
Aho ni toriau baka!- Baka wa shinanakya naoranai...
|
|
|
|
|
04-01-15, 08:08 AM
|
#58
|
|
Member
Join Date: Apr-2013
Location: Near GTA
Posts: 472
Country:
|
Re: My DIY snakeroom part 2, Backgrounds.
Quote:
Originally Posted by Tsubaki
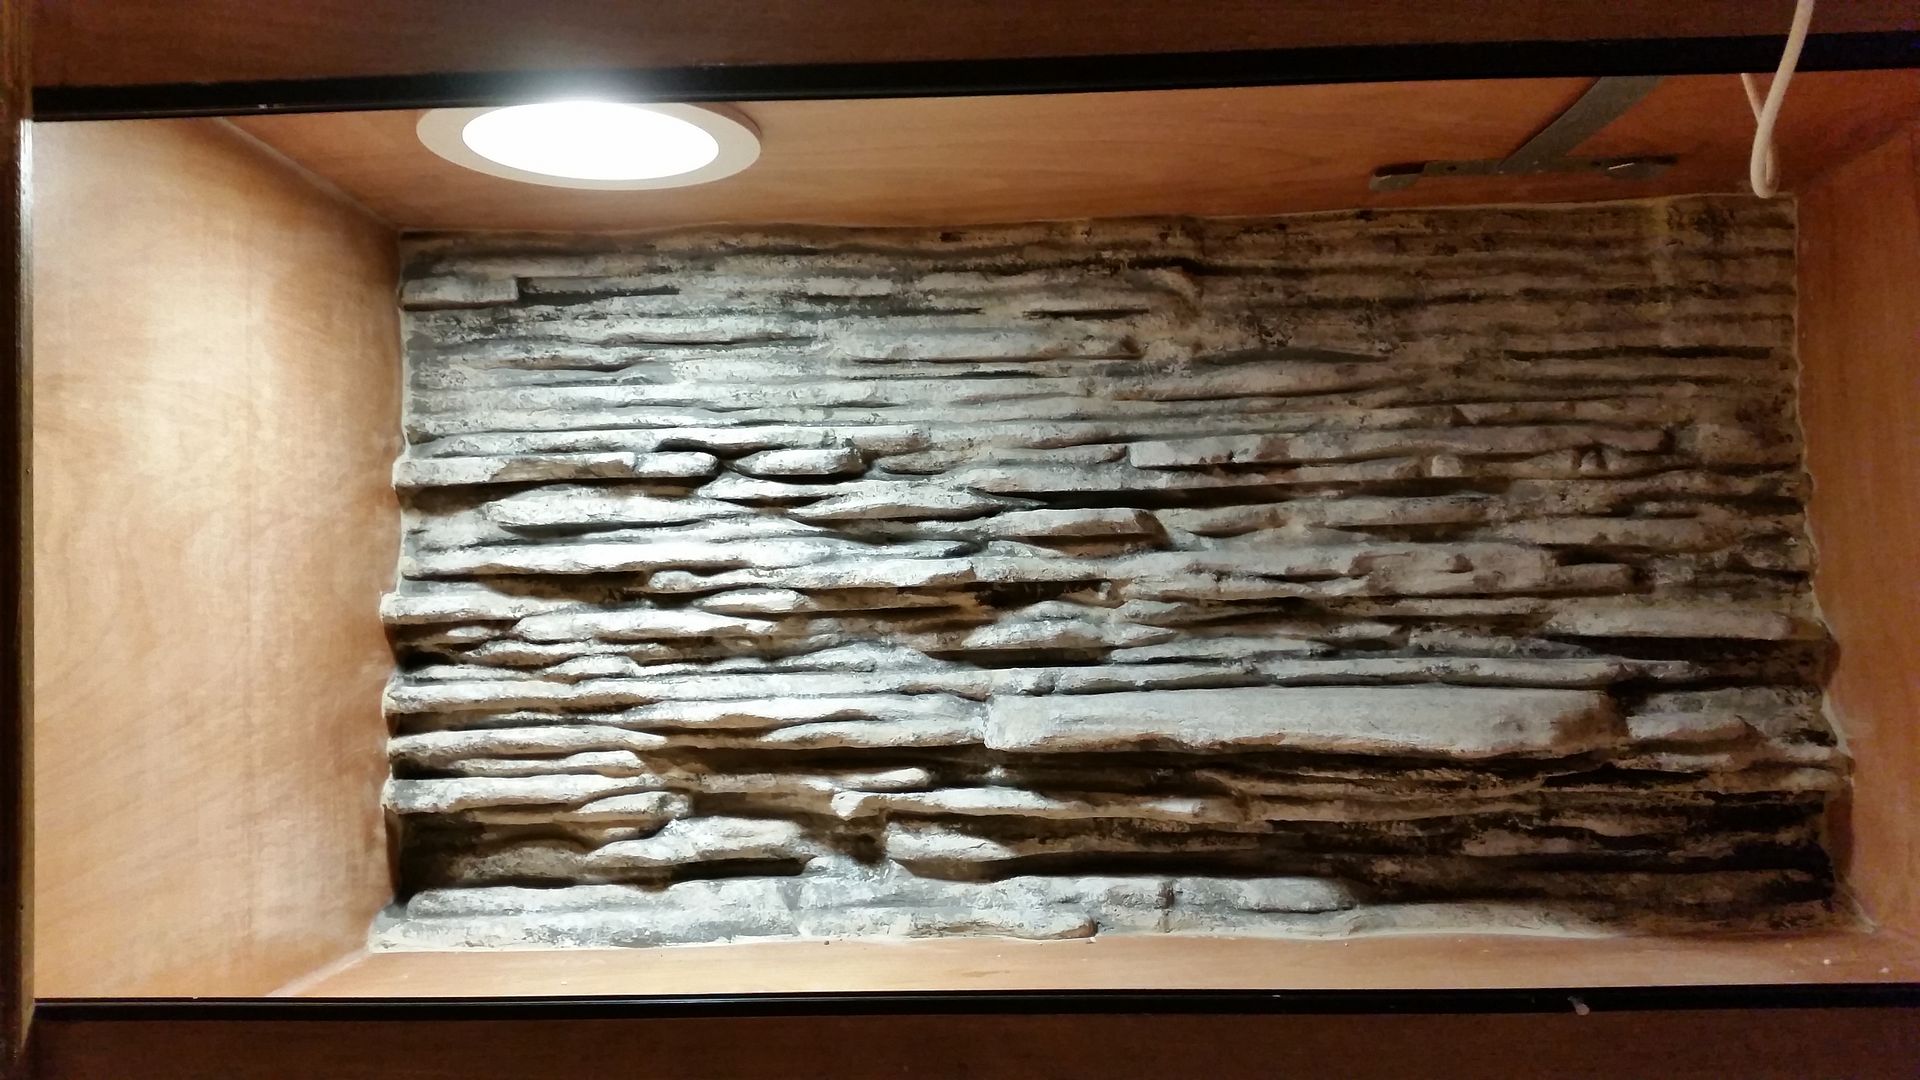
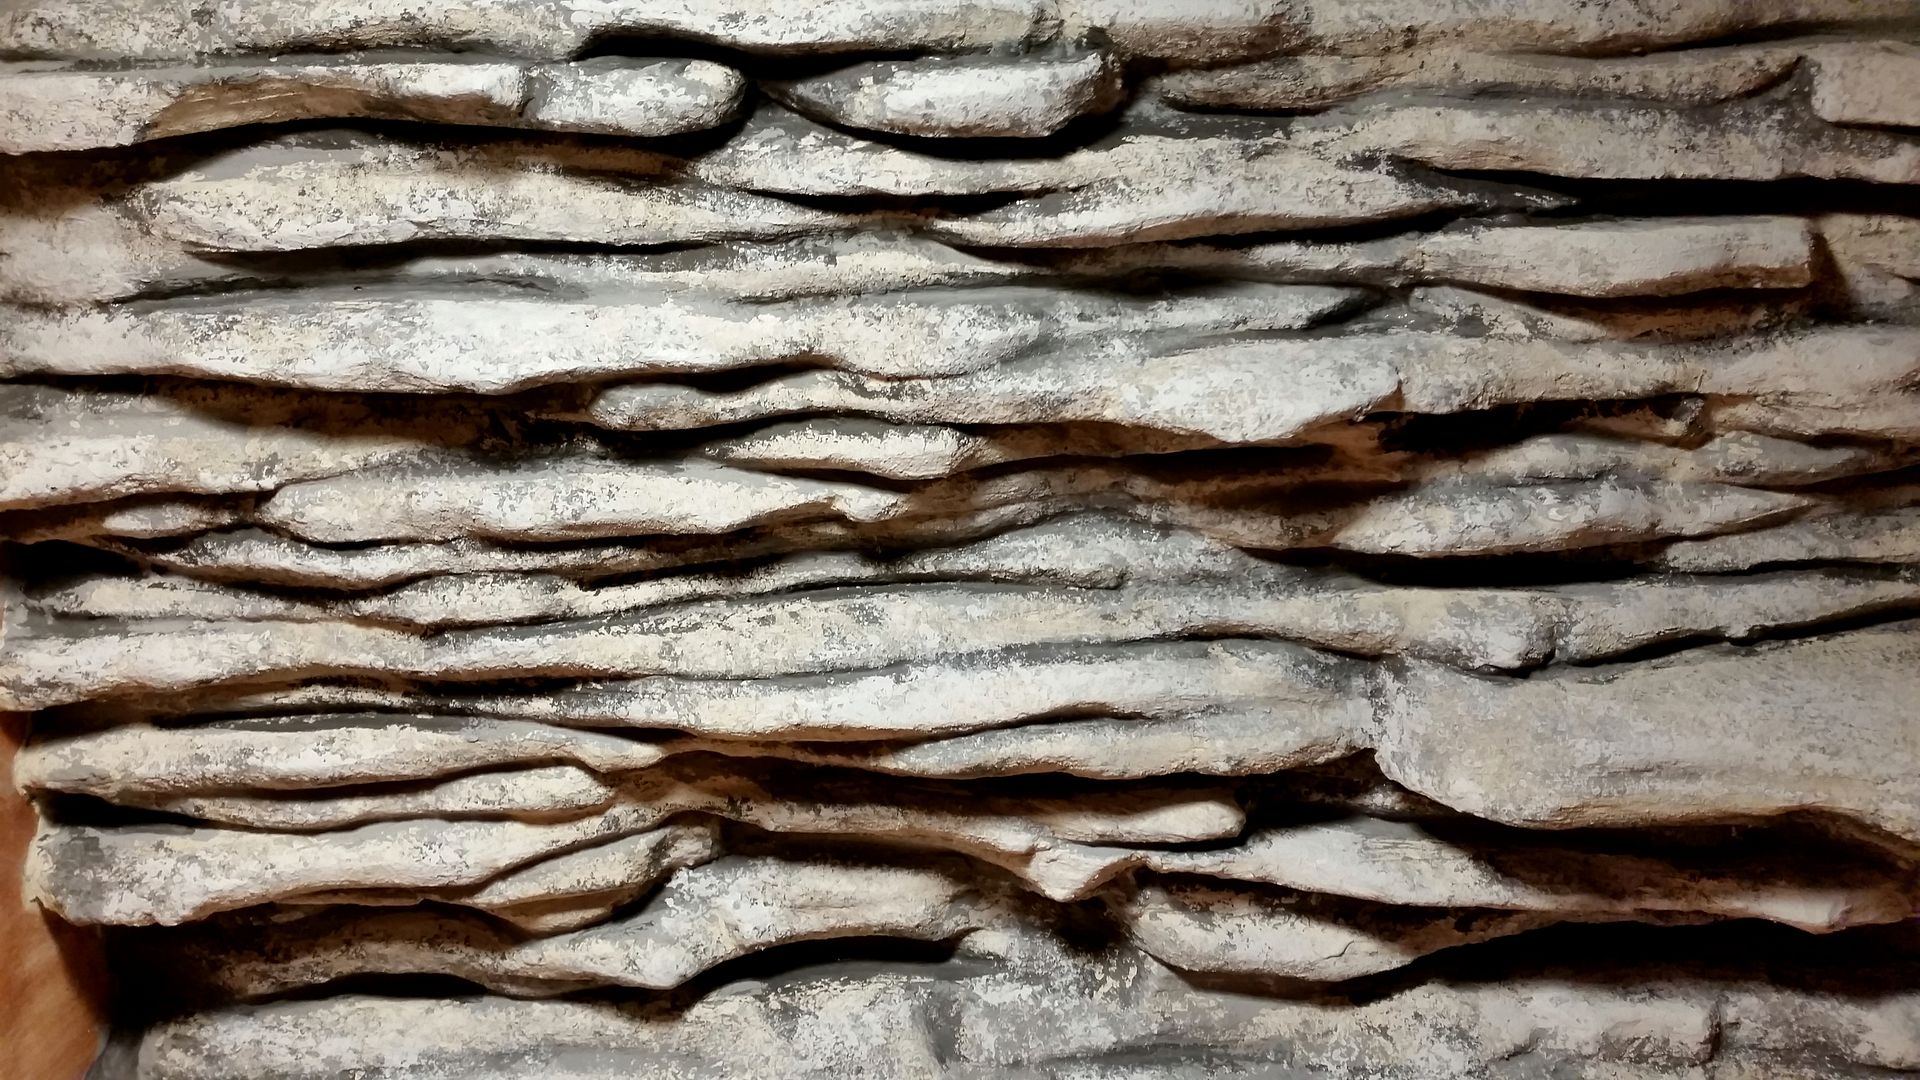
I took pictures of the finished and dried paint, only some detailed shots because you can't really see the difference otherwise. It ended up looking a lot like stone, i'm very happy |
Could you post your materials list and application proccess to get the foam to look like that? We are still thinking of hanging an arboreal box for a GTP in the downstairs living room. A background like that would be very pretty.
Thanks
Heather.
__________________
1.1 Us (Chris & Heather)
0.1 Yellow Naped Amazon Parrot
9.80+ Various Ball Pythons (give or take)
|
|
|
|
|
04-01-15, 10:53 AM
|
#59
|
|
Forum Moderator
Join Date: Jan-2014
Posts: 4,329
Country:
|
Re: My DIY snakeroom part 2, Backgrounds.
Materials so far is pretty simple,
Styrofoam.
Glue. (Make sure it's viable for the foam, some glues melt styrofoam)
Tile Glue.
Paint.
Other stuff i used:
A lighter to melt some parts (didn't use it much)
Natural sponge to paint.
Brushes to brush on tile-glue and paint
I cut thin strips into rock shaped pieces and glued them all on, covered them in several thinner layers of plain grey Tile-Glue. After it had a satisfactory coverage, painted it to make it look as natural as possible. After this i'm going to seal it all with epoxy resin, to make it 100% waterproof. That's all there is to it, a lot of cutting, gluing.. The rest is just creativity. Making a test piece really helped a lot.
__________________
Aho ni toriau baka!- Baka wa shinanakya naoranai...
|
|
|
|
|
04-05-15, 05:12 AM
|
#60
|
|
Forum Moderator
Join Date: Jan-2014
Posts: 4,329
Country:
|
Re: My DIY snakeroom part 2, Backgrounds.
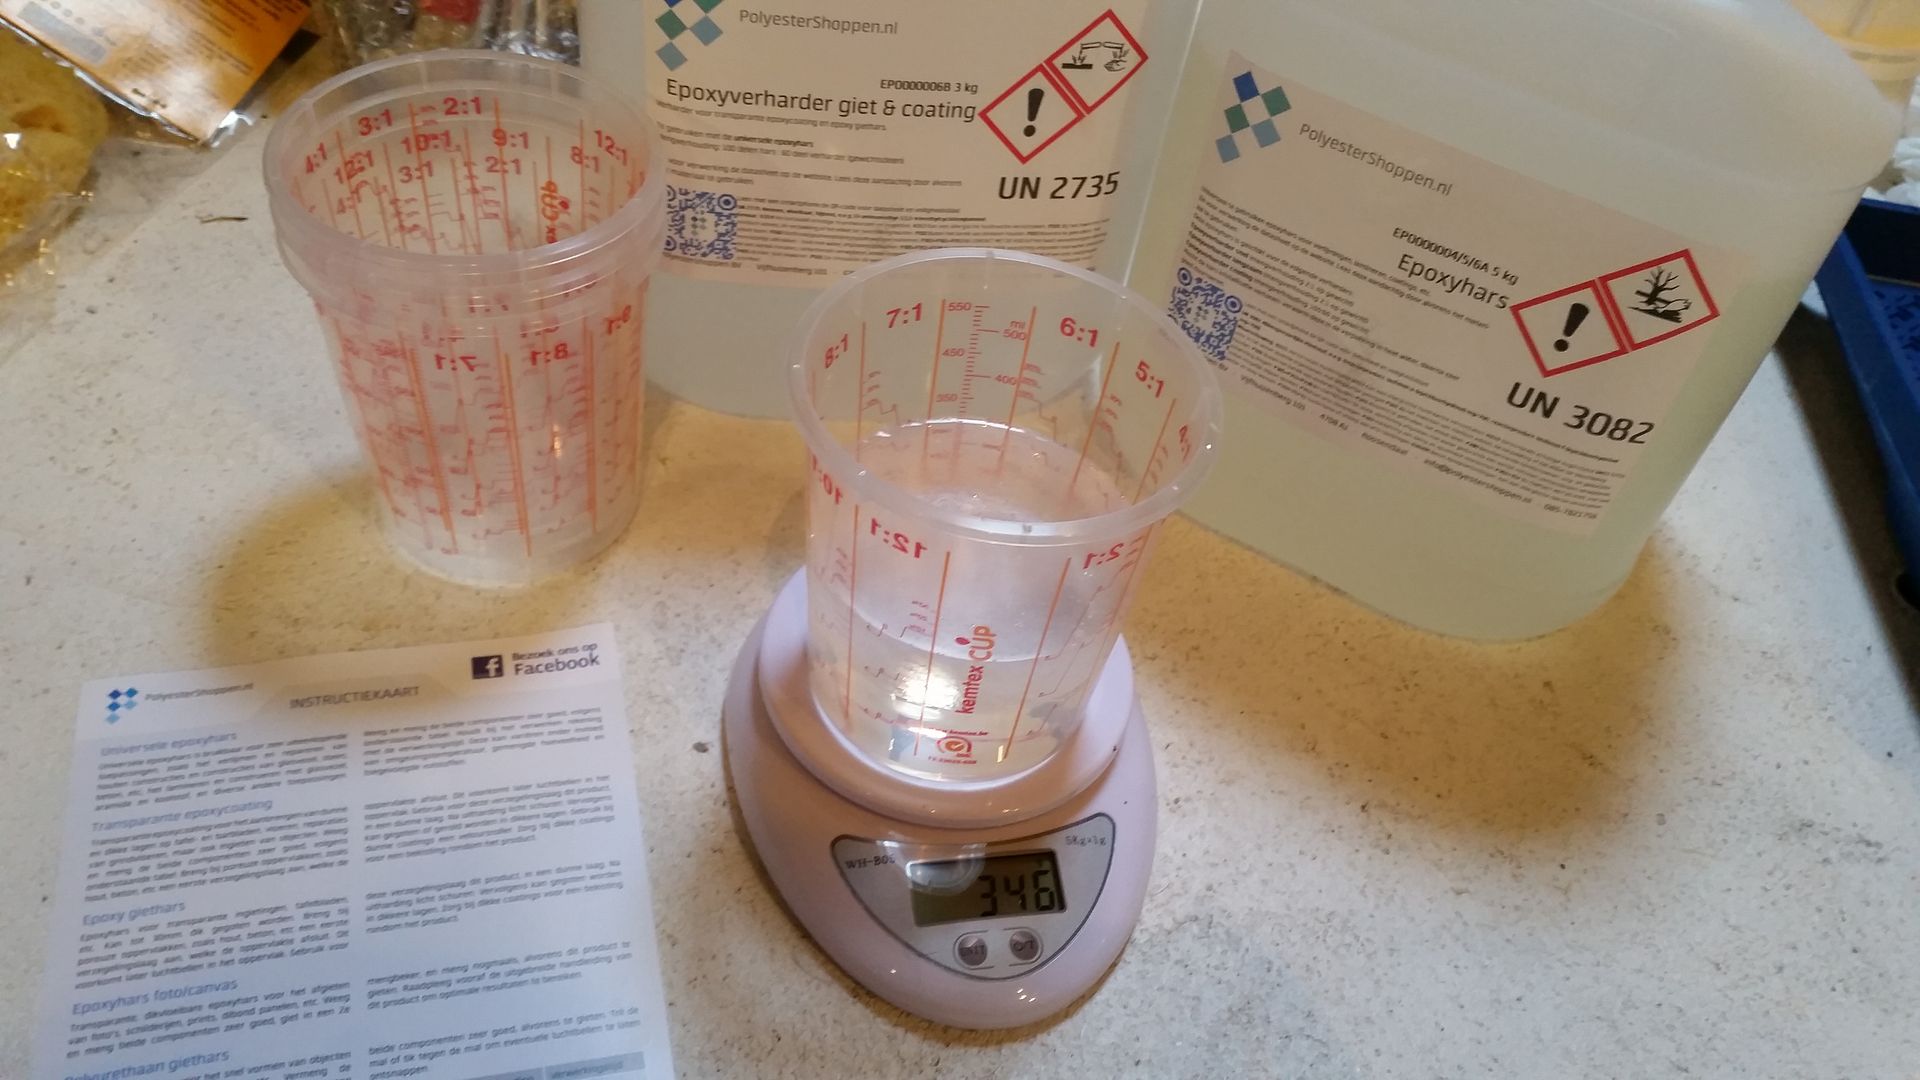
Alright here we go, Epoxy!!
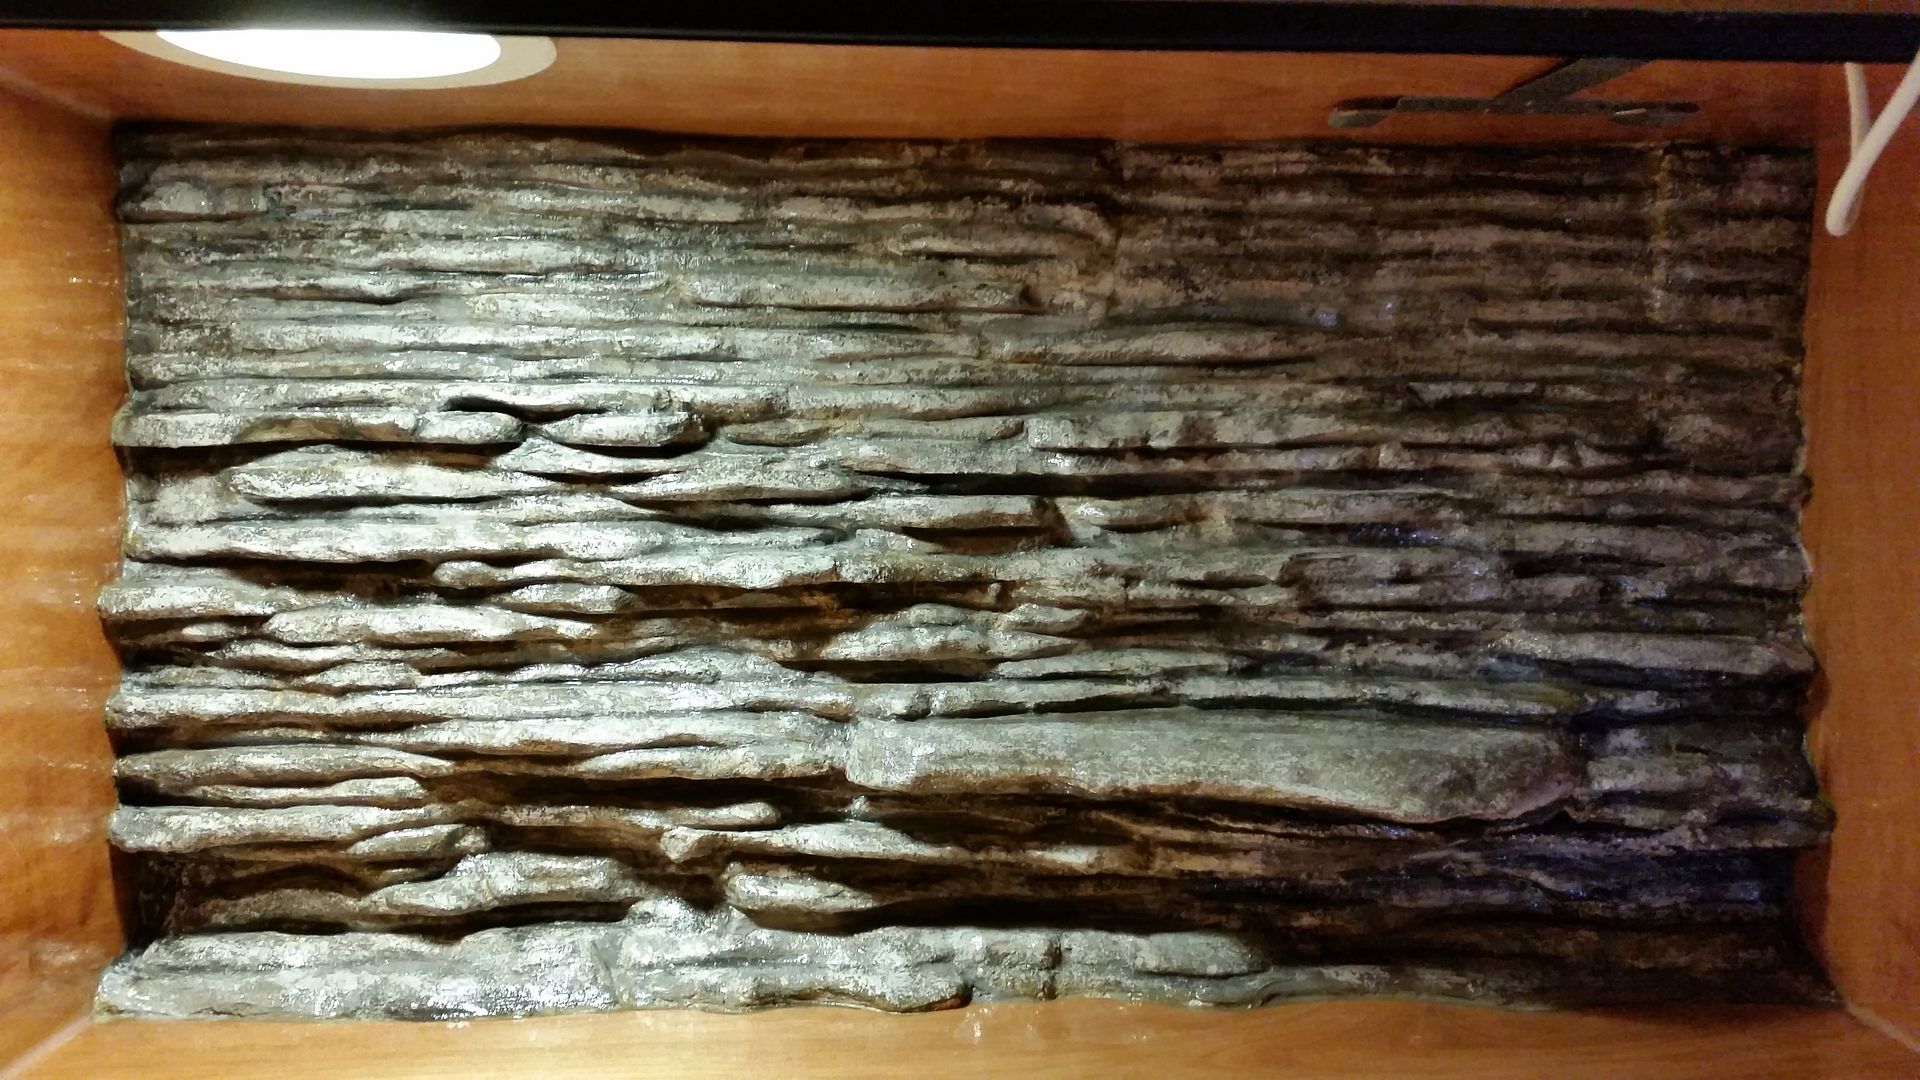
The amounts for the mixture have to be exactly right, best to use a scale!! It applied fairly easy, have to use gloves though (And after applying it you'll be glad you were wearing gloves, the gloves deteriorated badly) After the first layer, i can not believe how good it looks!!! i hope it stay this way, because i absolutely love it! It doesn't translate well onto the photo's, but i swear from a normal point of view, it looks JUST LIKE STONE! After i finish the last layer, i will do my best and try with my Canon DSLR to take a more truthful looking picture.

__________________
Aho ni toriau baka!- Baka wa shinanakya naoranai...
|
|
|
|
 Posting Rules
|
You may not post new threads
You may not post replies
You may not post attachments
You may not edit your posts
HTML code is Off
|
|
|
All times are GMT -6. The time now is 01:40 PM.
Powered by vBulletin®
©2000 - 2025, Jelsoft Enterprises Ltd.

Copyright © 2002-2023, Hobby Solutions.
|
 |


 Linear Mode
