|
|  |
| Notices |
Welcome to the sSnakeSs community. You are currently viewing our boards as a guest which gives you limited access to view most discussions and access our other features. By joining our free community you will have access to post topics, communicate privately with other members (PM), respond to polls, upload content and access many other special features. Registration is fast, simple and absolutely free so please, join our community today! If you have any problems with the registration process or your account login, please contact contact us.
|
 02-27-13, 02:46 PM
|
#1
|
|
Member
Join Date: Nov-2012
Posts: 171
Country: 
|
A few pics of the bosc enclosure so far
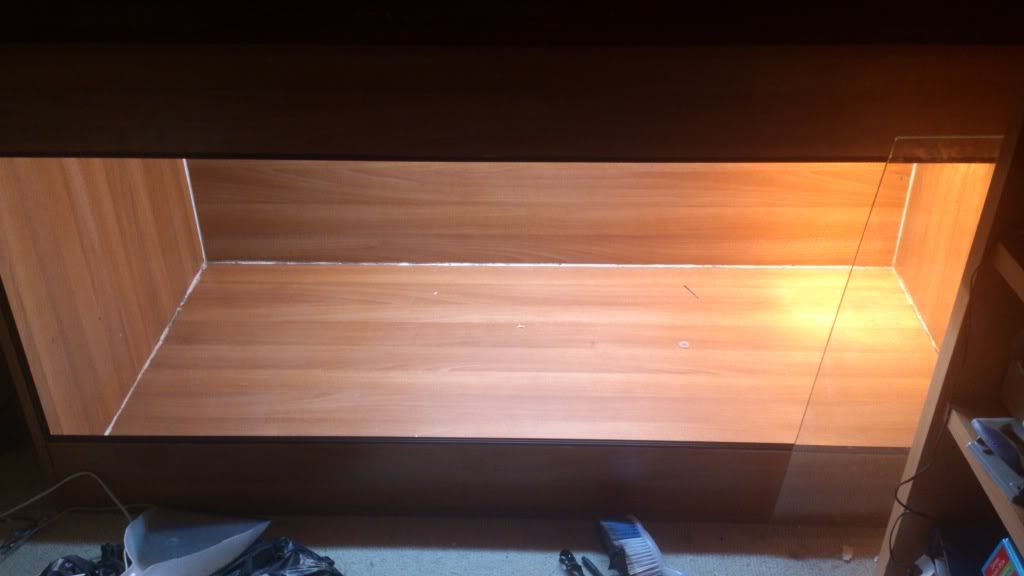
Here are a few pics of my monitor enclosure so far. It is a 6x3x3 viv that I bought second hand off of my girlfriends big sister as an impulse buy for £100 so thoyght it was a quite good bargain although I have already smashed one of the glass doors haha.
The front barrier is on the small side so gonna have to fix a thick peice if wood to it to allow for a deeper substrate.
DSC_0669_zps75a64336.jpg Photo by fuzzhc | Photobucket
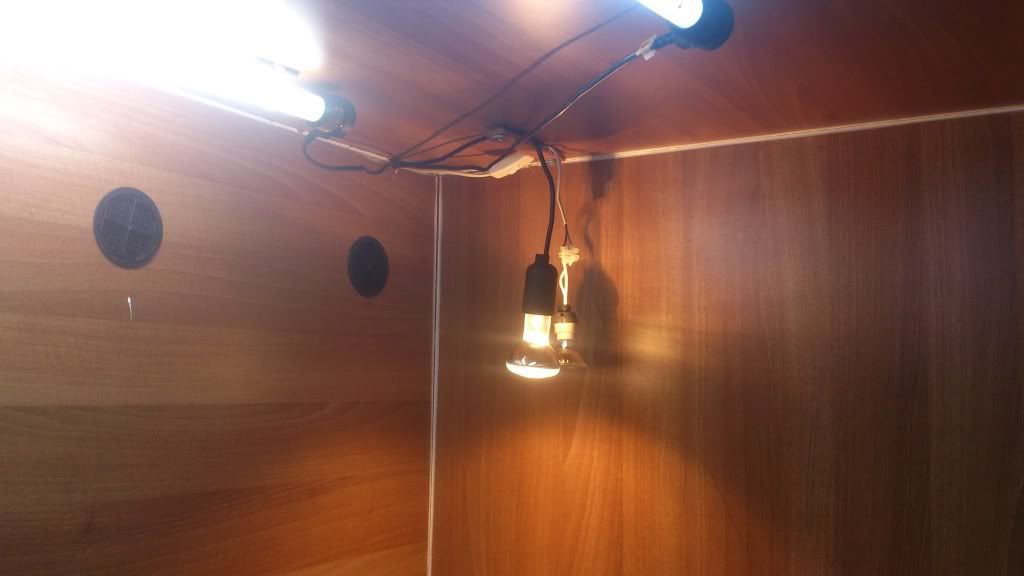
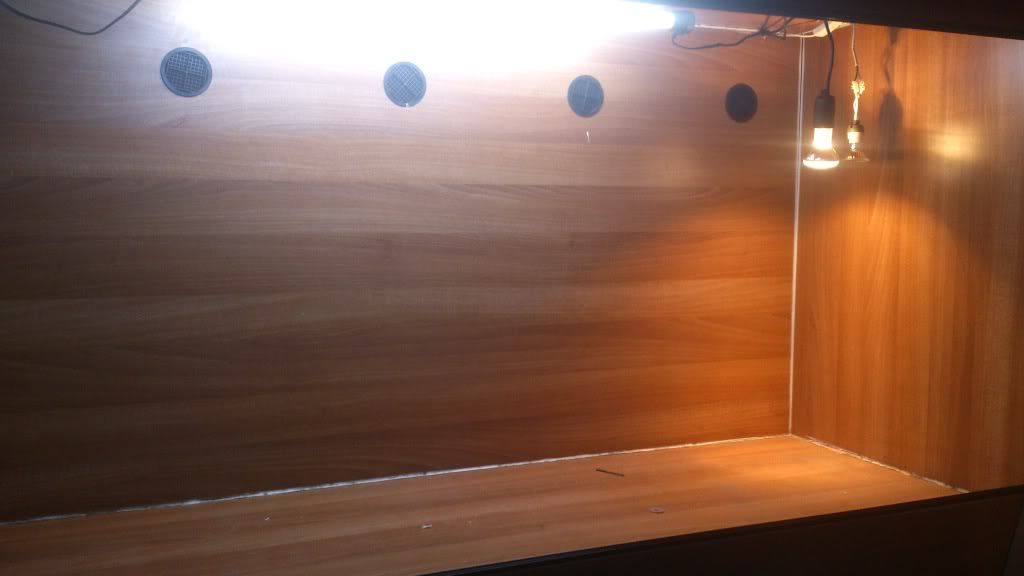
I have fixed 2 uv tubes and mounted 2 light fixtures but will have to change the bulbs. Once it is all set up ill monitor the basking area and add another if needs be.
DSC_0668_zpsf428ee13.jpg Photo by fuzzhc | Photobucket
There was already air vents on the back wall so im going to seal them up and re do the silicon for air tightness.
DSC_0666_zpsab091f4a.jpg Photo by fuzzhc | Photobucket
Come the weekend I hope to have it finnished and ready for testing temps, humidity etc. I have some various hides, logs, rocks and tiles for a basking area.
I will be adding some grass seeds alog with a small lemon tree I have sitting around (if the tree wont be a total waste of time and get demolished lol)
Any thoughts or suggestions would be great.
Thanks 
Last edited by infernalis; 02-28-13 at 01:41 PM..
|

|
|
|
02-27-13, 03:10 PM
|
#2
|
|
Member
Join Date: Oct-2012
Posts: 242
Country: 
|
Re: A few pics of the bosc enclosure so far
I would re address that light situation, maybe run the wires in a conduit or something?
|
|
|
|
|
02-27-13, 03:13 PM
|
#3
|
|
Member
Join Date: Nov-2012
Posts: 171
Country:
|
Re: A few pics of the bosc enclosure so far
Never thought of that actually lol. Was just gonna cable tie them together but I should have some old conduit or such lying around in the works van.
Edit: and cover up the terminal block with insulating tape.
|
|
|
|
|
02-27-13, 04:14 PM
|
#4
|
|
Member
Join Date: Oct-2011
Posts: 2,237
Country: 
|
Re: A few pics of the bosc enclosure so far
Could just drill a hole for the wires to go through right above each fixture too. Might be easier than all the conduit.
How strong are those sides? You may need to brace them from the outside before you put the dirt in. If that is just mdf or a similar particle board, Id be worried about how the weight of all that dirt is going to bow the long sides especially.
I like your idea to attempt live plants. Its possible it might not work, but the ones that I have seen that did work looked great.
__________________
The plural of anecdote is not data
|
|
|
|
|
02-27-13, 05:03 PM
|
#5
|
|
Member
Join Date: Jan-2013
Posts: 974
Country: 
|
Re: A few pics of the bosc enclosure so far
Hi, I don`t think the material will last more than a few weeks once you put substrate in it (I presume a soil/playsand mix)? As it needs to be kept a little moist, it will soon penetrate the surface, also, as Joshua (jarich) said, it probably won`t be strong enough along the length either, because of the weight.
The easiest way to modify what you have would be to use a plastic builders/dog bath underneath (they come in various sizes), cut a hole out in the floor, and drop the bath in, that way there`s no pressure on the wooden parts at all (obviously it would mean raising the wooden enclosure off the floor). That would mean the tank would then be around 4 feet tall (the baths are usually 12inches+ H).
Alternatively, you could make a 2 x 2 inch framework up to substrate level on the inside, then cover that with 1/2 inch plywood, and in turn fix FRP (fibreglass reinforced plastic) sheet on that which would make it completely waterproof/"claw proof", and much stronger. Would you be prepared to try that (it`s really very easy, either way)?
|
|
|
|
|
02-27-13, 05:10 PM
|
#6
|
|
Member
Join Date: Oct-2011
Posts: 2,237
Country:
|
Re: A few pics of the bosc enclosure so far
Ah, yes of course, the tub underneath is a great idea, Stefan. Something like this one for ackies, only bigger:
http://www.ssnakess.com/forums/varan...ure-build.html
__________________
The plural of anecdote is not data
|
|
|
|
|
02-27-13, 05:17 PM
|
#7
|
|
Member
Join Date: Jan-2013
Posts: 974
Country:
|
Re: A few pics of the bosc enclosure so far
Quote:
Originally Posted by jarich

|
Yes, it`s a very effective way, I did that with my Water monitor`s tank, it`s still possible to add bark/leaves etc on the top so there`s more depth without too much weight. The tubs are underneath, you can just see the black plastic below the bottom wooden rail.
001 Varanus salvator macromaculatus enclosure | Flickr - Photo Sharing!
|
|
|
|
|
02-27-13, 06:33 PM
|
#8
|
|
Member
Join Date: Nov-2012
Posts: 171
Country:
|
Re: A few pics of the bosc enclosure so far
The wood its self is heavy duty at maybe an inch think, I duno ill have to check tomorrow. It was really heavy when I was carrying it in. Its secured by 4 x 3-4 inch screws at the top and bottom and round the sides but I could always secure it with more. Because of the sheer weight of the wood alone I dont think a dog bath or the likes would support it. I think I might try with the framework inside though!
Thanks for the tips!
|
|
|
|
|
02-28-13, 01:37 PM
|
#9
|
|
Member
Join Date: Oct-2011
Posts: 2,237
Country:
|
Re: A few pics of the bosc enclosure so far
Huh, ok from the picture it just looks like that laminated particle board that they make stuff like Ikea furniture out of. If its actually wood that should be a much different story. Id still strengthen it with a couple 2x4s due to the extreme weight of the substrate though. Just to give you an idea, I have 2x4s running up the base of my enclosure every 18 inches, and used 3/4 inch plywood over that. Remember a cubic meter (roughly 3 ft x 3 ft x 3ft) of dirt weighs about 1.5 tons!
__________________
The plural of anecdote is not data
|
|
|
|
|
02-28-13, 02:06 PM
|
#10
|
|
Member
Join Date: Nov-2012
Posts: 171
Country:
|
Re: A few pics of the bosc enclosure so far
Woah! I didnt even realise how much it would weigh lol! Yeah thanks ill definetly be doing that then. Should the 2x4s be along the base and sides or from the base upwards in the corners? If you get me
|
|
|
|
|
02-28-13, 02:15 PM
|
#11
|
|
Member
Join Date: Oct-2011
Posts: 2,237
Country:
|
Re: A few pics of the bosc enclosure so far
I would honestly sort of build a frame equal to the area you are filling with soil, then add supports in at least every two feet. So along the bottom, run a 2x4 along each edge and one down the middle. On the long sides, run a 2x4 along the top and bottom, and one down each corner. Then put a couple supports down between the top and bottom every 2 feet. Does that make sense? Its a little hard to get across in description.
__________________
The plural of anecdote is not data
|
|
|
|
|
03-03-13, 04:16 PM
|
#12
|
|
Member
Join Date: Nov-2012
Posts: 171
Country:
|
Re: A few pics of the bosc enclosure so far
Yeah I get you I think. So just like a kind of inner frame? Ive kept the small 50w spot bulb but changed the other to a bigger diameter 50w spot that I had and added a 3rd light to make a triangle shape with them. The basking spot was only reaching 125F so ill try lowering them but how close to the basking spot is a safe distance? Or do they tend not to reach up and touch the bulb? I dont have this problem in the smaller enclosure but just want to be on the safe side.
|
|
|
|
|
03-03-13, 04:27 PM
|
#13
|
|
Member
Join Date: Oct-2011
Posts: 2,237
Country:
|
Re: A few pics of the bosc enclosure so far
Mine will reach up and slap the lights around sometimes. As far as the distance, its more about what is required to get the proper temp. I think mine sit about 10-12 inches away.
__________________
The plural of anecdote is not data
|
|
|
|
|
03-03-13, 04:40 PM
|
#14
|
|
Member
Join Date: Nov-2012
Posts: 171
Country:
|
Re: A few pics of the bosc enclosure so far
Cool. Just a bit paranoid that hel reach up and burn him self if theyre too low. Ill try at 12 inches over night then adjust from there.
|
|
|
|
|
03-03-13, 05:03 PM
|
#15
|
|
Member
Join Date: Oct-2011
Posts: 2,237
Country:
|
Re: A few pics of the bosc enclosure so far
As long as you don't have a cover or anything like that to grab hold of, it shouldnt be a problem. The bulb itself is just smooth glass, and it will just swing away if he touches it (if its not a mounted fixture but rather a hanging fixture like most of us have)
__________________
The plural of anecdote is not data
|
|
|
|
 Posting Rules
|
You may not post new threads
You may not post replies
You may not post attachments
You may not edit your posts
HTML code is Off
|
|
|
All times are GMT -6. The time now is 07:52 PM.
Powered by vBulletin®
©2000 - 2025, Jelsoft Enterprises Ltd.

Copyright © 2002-2023, Hobby Solutions.
|
 |


 Linear Mode
